To reduce bubbles when using a pressure pot for resin, start by choosing a compatible model and preparing your workspace with safety gear. Carefully fill and seal the pressure vessel, avoiding trapping air. Set the pressure between 40-60 psi and monitor it throughout curing. Proper mold preparation and gentle pouring also help minimize bubbles. Keep everything well-maintained and adjust your setup as needed—stay tuned to learn detailed steps to achieve bubble-free, professional results.
Key Takeaways
- Select a compatible pressure pot with easy setup and safety features like quick-release clamps and reliable gauges.
- Properly fill and seal the resin mold in the pressure pot without trapping air bubbles.
- Set the pressure to 40-60 psi before curing, monitoring closely to maintain consistent compression.
- Apply pressure during the semi-rigid curing stage to compress trapped bubbles and prevent reappearance.
- Maintain a clean workspace, inspect equipment regularly, and use mold release agents to ensure bubble-free finishes.

OFFNOVA Resin Bubble Remover, 10-Min Vacuum Chamber Machine, Pressure Pot for Epoxy Resin Molds Casting, DIY Arts Crafts, Jewelry Making
Powerful Vacuum Defoaming – This bubble removing machine features a mini negative pressure pump that quickly generates and…
As an affiliate, we earn on qualifying purchases.
As an affiliate, we earn on qualifying purchases.
Why a Pressure Pot Helps Reduce Bubbles in Resin Casting

A pressure pot helps reduce bubbles in resin casting by applying consistent, high pressure to the entire container. This uniform pressure forces trapped air bubbles tiny enough to be invisible under normal conditions to compress or dissolve back into the resin. Resin viscosity plays a key role here; lower viscosity resins allow bubbles to escape more easily, but high viscosity resins trap bubbles more stubbornly. The pressure maintains pressure consistency, ensuring that bubbles don’t re-expand or form during curing. As a result, the resin becomes clearer, with fewer imperfections. Using a pressure pot effectively minimizes surface flaws and internal bubbles, giving your castings a smoother, professional finish. This method is essential for achieving high-quality, bubble-free resin projects.

California Air Tools 255C 2.5 Gallon Pressure Pot for Epoxy Resin Casting, Coated Steel Tank, Portable, Blue
HIGH-PERFORMANCE: The California Air Tools pressure pot for resin casting is designed to provide reliable and efficient performance…
As an affiliate, we earn on qualifying purchases.
As an affiliate, we earn on qualifying purchases.
How to Pick the Best Pressure Pot for Bubble-Free Resin

When choosing a pressure pot, you need to consider whether it’s compatible with your resin type to avoid issues. Ease of use also matters, especially if you’re new to pressure casting, so look for straightforward setups. Additionally, reviewing content formats and understanding how different designs impact bubble reduction can help you make an informed choice. Exploring pressure pot features can provide insights into how various models manage pressure and bubble suppression. Incorporating knowledge of Free Floating techniques can help you optimize your setup for better results. Being aware of surrounding environment conditions can also influence how effectively bubbles are minimized during curing. Considering material compatibility is essential to ensure the pressure pot functions correctly with your specific resin. By focusing on these points, you’ll find a pressure pot that helps you achieve bubble-free results efficiently.
Compatibility With Resin Types
Choosing the right pressure pot for resin depends heavily on the type of resin you plan to use, as different formulas have varying sensitivities to pressure and compatibility requirements. Not all pressure pots are suitable for every resin, so verifying resin compatibility is essential. Some resins, like epoxy, tolerate higher pressures, while others, such as certain urethanes, may require gentler conditions. Ensuring pressure compatibility prevents damage to the resin and the pressure pot itself. Proper pressure settings are crucial for achieving bubble-free results and depend on understanding your resin’s properties. Here’s a quick comparison:
| Resin Type | Pressure Compatibility | Notes |
|---|---|---|
| Epoxy | High | Suitable for most pressure pots |
| Polyester | Moderate | Use with caution |
| Urethane | Low to moderate | Select compatible pressure levels |
| Resin Blends | Varies | Check manufacturer guidelines |
Always match your resin’s needs with the pressure pot’s specifications for bubble-free results. Being aware of resin properties can help you select the most appropriate pressure settings for your project. Additionally, understanding pressure tolerance can prevent unexpected issues during curing. Proper pressure regulation is also vital to maintain consistent results and prevent over-pressurization that could damage the resin or equipment. Recognizing the importance of pressure uniformity ensures that the entire resin volume cures evenly without defects.
Ease of Use
Selecting a pressure pot that’s easy to operate can substantially improve your chances of achieving bubble-free resin casts. Ease of use is a key factor when choosing the right pressure pot, especially during user setup. Look for models with straightforward controls, clear instructions, and simple assembly processes. A user-friendly setup reduces the risk of mistakes that can introduce bubbles or cause leaks. Consider features like quick-release clamps, intuitive pressure gauges, and minimal parts to assemble. If you’re new to pressure casting, an easy-to-use pressure pot will save you time and frustration, ensuring consistent results. Additionally, choosing a model with simple maintenance requirements can help keep your setup hassle-free over time. When selecting a pressure pot, also consider ease of cleaning to prevent buildup and ensure longevity. Incorporating user-friendly features can further streamline the process, making bubble-free casting more achievable. Ultimately, a design that prioritizes simplicity and ease of use makes the entire process smoother, helping you produce flawless, bubble-free resin finishes with less effort. Being aware of pressure regulation options can also help maintain consistent pressure levels during curing.

mitreapel Silicone Mold Release Spray (14.4 oz) Release Agent Aerosol Spray
Perfect For Many Projects – Mold release spray is an excellent choice for almost any project that involves…
As an affiliate, we earn on qualifying purchases.
As an affiliate, we earn on qualifying purchases.
Preparing Your Workspace and Safety Gear Before Setup

Before setting up your pressure pot, make sure your workspace is organized and clutter-free to work efficiently. You’ll also want to gather essential safety gear like gloves, goggles, and a respirator to protect yourself during resin handling. Ensuring these precautions are in place helps create a safe environment for your project. Additionally, familiarizing yourself with DIY tools and safety tips can help prevent accidents and ensure proper use of your equipment. Remember to review resin safety guidelines to understand proper handling and disposal procedures. Incorporating proper indoor air quality measures, such as adequate ventilation, can also help reduce exposure to fumes and maintain a safer workspace. Being aware of water damage prevention techniques can also help protect your workspace from potential moisture-related issues. Taking the time to understand regional safety regulations can further enhance your safety practices during resin work.
Workspace Organization Tips
Setting up your workspace properly is essential to guarantee safe and efficient resin work with pressure pots. Start by clearing any workspace clutter to create a clean, organized area that minimizes distractions and hazards. Keep your tools well-organized in designated containers or tool trays, so everything is within easy reach and reduces the risk of accidents. Use shelves or pegboards to hang frequently used items, maintaining a tidy environment. Ensure your work surface is level and stable, free of debris or obstructions. Proper organization not only speeds up your workflow but also helps you focus on the task at hand, reducing mistakes. Including safety gear such as gloves, masks, and eye protection is crucial to protect yourself during resin work. A neat, well-organized workspace promotes safety, efficiency, and better results during your resin projects. Additionally, incorporating performance upgrades such as adjustable workbenches can further optimize your setup for various tasks. Maintaining a clean workspace also minimizes the risk of contamination or accidents, leading to higher quality results. Moreover, understanding common causes of equipment failure can help prevent unexpected setbacks and ensure longevity of your tools.
Essential Safety Equipment
Having a well-organized workspace is the first step to safe resin work with pressure pots, but equipping yourself with proper safety gear takes it a step further. Always wear safety goggles to protect your eyes from splashes and fumes, especially when handling resin or cleaning tools. Gloves are essential for handling resin and cleaning chemicals, preventing skin contact that can cause irritation or allergic reactions. Before starting, check that your gloves are intact and suitable for chemical handling. Proper safety equipment minimizes risks of accidents and exposure. Keep your safety gear nearby and use it consistently throughout the setup and pouring process. Prioritizing safety guarantees your workspace remains secure, allowing you to focus on achieving bubble-free resin with peace of mind.
California Air Tools 255C 2.5 Gallon Pressure Pot for Epoxy Resin Casting, Coated Steel Tank, Portable, Blue
HIGH-PERFORMANCE: The California Air Tools pressure pot for resin casting is designed to provide reliable and efficient performance…
As an affiliate, we earn on qualifying purchases.
As an affiliate, we earn on qualifying purchases.
How to Fill and Seal Your Pressure Pot Correctly for Best Results

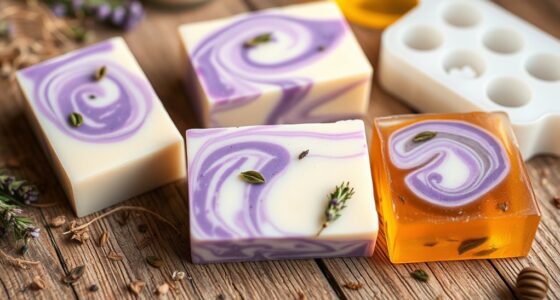
To guarantee your resin cures properly under pressure, filling and sealing your pressure pot correctly is essential. Start by pouring your resin with the desired resin coloring into the mold, ensuring there are no air bubbles. Carefully fill the pressure pot, leaving enough space to accommodate the resin expansion during curing. When sealing, double-check that the lid is securely locked, and the gasket is clean and properly positioned to prevent leaks. Proper mold preparation includes cleaning the mold and ensuring it’s free of dust or debris, which can trap bubbles. Once sealed, avoid over-tightening, as this can damage the gasket. A secure seal and proper filling technique help minimize bubbles and ensure a smooth, clear finish.
Setting the Right Pressure Level for Resin Curing

Once your pressure pot is securely sealed and filled properly, the next step is to determine the correct pressure level for curing your resin. Use the pressure gauge to monitor the internal pressure precisely, ensuring you avoid over-pressurizing. Typically, a pressure of around 40-60 psi works well for most resin projects, but check your resin manufacturer’s recommendations. It’s essential to set a safe pressure level that reduces bubbles without risking damage. Familiarize yourself with your pressure pot’s safety release valve; this is a vital safety feature. If you notice the pressure rising too high or feel uncomfortable, activate the safety release immediately to prevent accidents. Always prioritize safety when adjusting and maintaining the pressure during curing.
When and How to Apply Pressure During Resin Curing

Knowing when to apply pressure is vital for achieving a flawless resin finish. You should start applying pressure once the resin has begun to cure but isn’t fully hardened, guaranteeing proper bonding and clarity. Maintaining ideal pressure levels at the right time helps prevent voids and ensures a smooth, professional result.
When to Apply Pressure
Applying pressure at the right moment during resin curing is crucial for achieving clear, void-free results. The key is to wait until the resin reaches a semi-rigid state, just before it fully hardens, to guarantee the pressure effectively compresses bubbles. Proper pressure application timing prevents trapping air and reduces surface imperfections. Use curing pressure techniques that involve gradually increasing pressure to avoid disturbing the resin’s surface. Avoid applying pressure too early, which can interfere with the initial setting, or too late, when bubbles have already formed or hardened. Monitoring the resin’s consistency helps determine the ideal moment. Timing is critical; applying pressure at just the right stage ensures bubbles are minimized and your final piece remains clear and flawless.
Optimal Pressure Levels
To achieve the best results, you need to apply the right amount of pressure at the correct stage of resin curing. Ideal pressure levels typically range between 40 to 60 psi, but always start with pressure calibration to ensure accuracy. Applying too much pressure can cause resin to crack or leak, so adhering to safety protocols is essential. Use a pressure gauge to monitor levels precisely. Remember, consistent pressure helps eliminate bubbles and improves clarity. Check your equipment regularly to avoid fluctuations. Be cautious and never bypass safety features. Proper calibration and safety measures ensure you maintain the correct pressure without risking damage or injury. This careful approach guarantees a bubble-free, high-quality resin finish.
Timing for Pressure Application
Timing is crucial when applying pressure during resin curing to guarantee ideal results. You should start applying curing pressure once the resin reaches its initial gel stage, typically a few minutes after pouring. This prevents bubbles from becoming trapped as the resin begins to harden. Avoid applying pressure too early, which can cause uneven curing or disturb the resin’s surface. Wait until you see the resin set enough to support pressure without shifting, but before it fully cures. Consistent pressure during this window helps compress bubbles and improve clarity. Monitor the resin closely to determine the right pressure timing, ensuring you don’t rush or delay. Proper timing maximizes the benefits of your pressure pot, delivering a bubble-free, smooth finish.
Common Setup Mistakes That Cause Bubbles and How to Avoid Them

One common mistake that leads to bubbles in resin pressure pots is improper venting. When you don’t vent correctly, trapped air can cause bubbles during curing. Additionally, neglecting resin compatibility can result in uneven curing and more bubbles. Failing to guarantee workspace safety can also lead to rushed or careless setup, increasing errors. To avoid these issues, keep these tips in mind:
- Always double-check resin compatibility before pouring
- Vent the pressure pot properly to release trapped air
- Maintain a clean, organized workspace to prevent contamination
- Follow safety protocols to avoid rushed mistakes
Troubleshooting Bubble Problems and Fine-Tuning Your Pressure Settings

When you notice bubbles forming in your resin after applying pressure, it’s essential to troubleshoot your pressure setup carefully. First, check your resin viscosity; higher viscosity resins trap more bubbles, so adjusting your resin’s temperature or using a thinner resin can help. Next, verify your pressure gauge calibration—if your gauge isn’t accurate, you might not be applying the correct pressure. Use a reliable gauge to ensure consistent pressure levels. Fine-tuning involves gradually increasing pressure and observing bubble behavior, reducing pressure if bubbles persist, or increasing it slightly if bubbles are still escaping. Consistent monitoring and adjusting based on resin viscosity and gauge accuracy can considerably reduce bubbles, leading to a clearer, bubble-free finish.
How to Maintain and Clean Your Pressure Pot for Long-Term Use

Proper maintenance and cleaning of your pressure pot are essential to guarantee its longevity and consistent performance. Regular upkeep prevents buildup, corrosion, and ensures safe operation. After each use, clean the interior and exterior with appropriate cleaning supplies like mild soap, brushes, and lint-free cloths. Always dry your pressure pot thoroughly before storage to prevent rust. Use proper storage solutions—store in a dry, cool place away from direct sunlight and dust. Check seals and gaskets regularly, replacing any worn parts. Maintain a schedule for deep cleaning to remove residue and debris that can affect performance. Keep your pressure pot in top shape with these simple steps, ensuring it functions flawlessly for many uses to come.
Tips for Achieving Flawless Resin Finishes With Your Pressure Pot

Achieving flawless resin finishes with your pressure pot requires attention to detail and precise control over your process. Start with thorough mold preparation—clean and dry your molds to prevent imperfections. When using resin additives, choose those that reduce bubbles and enhance clarity, but add them sparingly to avoid issues. Mix resin slowly to minimize air entrapment, and pour carefully to prevent introducing new bubbles. Before pressurizing, ensure your resin is free of surface debris. Maintain consistent pressure during curing to compress remaining bubbles and achieve a smooth finish. Sand and polish your piece afterward for added clarity. With careful mold prep and the right resin additives, you’ll produce stunning, flawless resin finishes that showcase your craftsmanship.
Frequently Asked Questions
Can I Use a Pressure Pot With All Types of Resin?
You can generally use a pressure pot with most types of resin, but check resin compatibility first. Some resins may react differently under pressure, so verify the manufacturer’s recommendations. Regular pressure pot maintenance is essential to guarantee it functions properly and prevents leaks or pressure loss. Always follow setup guidelines, and if unsure about compatibility, test with a small batch to avoid wasting material or damaging your equipment.
How Long Should I Apply Pressure During Curing?
You should apply pressure for at least 4 to 6 hours during curing to guarantee ideal curing efficiency. Extending pressure beyond this can help eliminate residual bubbles and improve clarity, especially with thicker layers. Keep in mind, the ideal pressure duration varies depending on resin type and project size. Regularly check your resin’s instructions, and always monitor the curing process to achieve the best results.
Is It Necessary to Remove Bubbles After Applying Pressure?
Yes, you still need to do bubble removal after applying pressure. Pressure application helps reduce and prevent bubbles, but it doesn’t eliminate all existing ones. To guarantee a clear, bubble-free finish, you should carefully remove any remaining bubbles with a toothpick or heat gun before curing. This extra step ensures a smoother surface and better overall quality, even when using a pressure pot for resin.
What Safety Precautions Are Essential When Using a Pressure Pot?
Using a pressure pot is like handling a delicate craft, so safety’s key. Always wear proper safety gear—gloves, goggles, and a mask—to protect against resin fumes and potential splashes. Before pressurizing, do pressure testing to guarantee the vessel’s integrity. Never bypass safety protocols, and double-check valves and seals. Stay vigilant, follow manufacturer instructions, and keep your workspace well-ventilated to avoid accidents.
How Often Should I Inspect and Replace Pressure Pot Parts?
You should inspect your pressure pot parts at least every three to six months, depending on how often you use it. Regular pressure pot maintenance involves checking for wear, cracks, or corrosion and replacing any damaged or worn components promptly. Keep an eye on the gasket, valve, and seals, and follow the manufacturer’s guidelines for part replacement to guarantee safety and peak performance.
Conclusion
Think of your pressure pot as the steady drumbeat in your resin symphony. When you set it right, bubbles drift away like distant echoes, leaving behind a flawless finish. Keep your setup tuned and your gear clean, and your resin will sing with clarity. With patience and care, you’ll master the rhythm, turning each cast into a masterpiece—bubble-free, vibrant, and perfectly polished, like a melody that lingers long after the last note.