
TL;DR
Moving your rig into a closet can drastically reduce noise and reflections. Focus on placement, sealing gaps, and proper absorption to get a clean sound. It’s about strategy, not just foam.
Ever wondered why your closet sounds better than your desk? It’s not just the foam—it’s about how you use the space. You can turn a tiny closet into a surprisingly effective vocal booth with the right tricks. No fancy studio needed—just smart placement and layered dampening.
This guide reveals proven strategies to silence unwanted noise, control reflections, and make your closet a recording haven. Whether you’re recording vocals, podcasts, or voice-overs, these tips will help you get studio-quality sound in the smallest space.
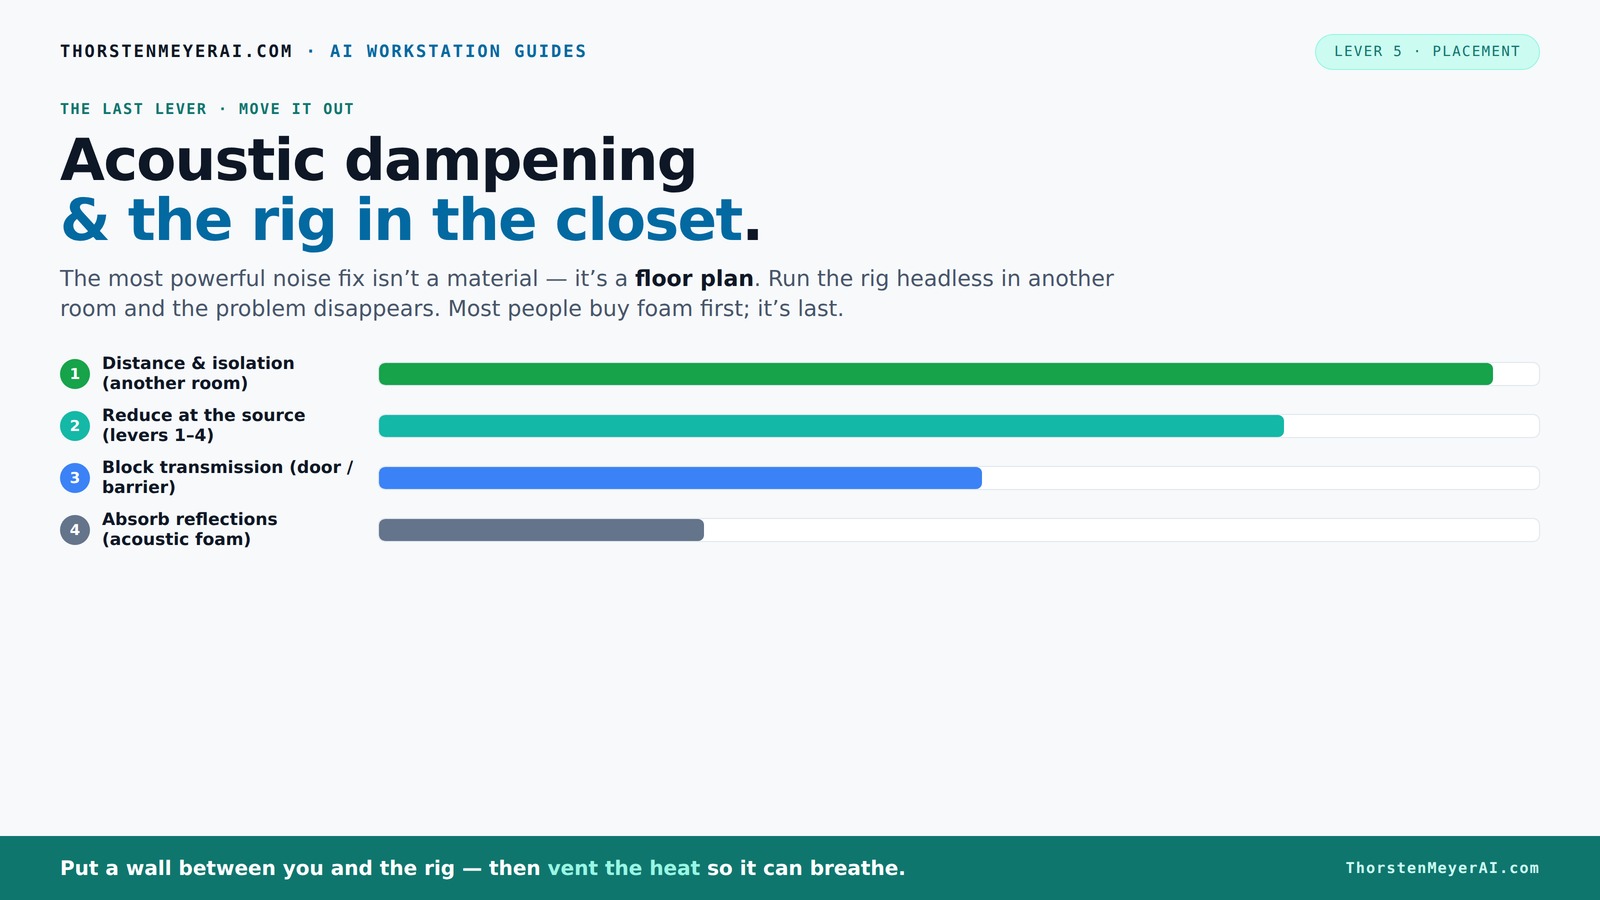
Acoustic dampening
& the rig in the closet.
The most powerful noise fix isn’t a material — it’s a floor plan. A rig you can’t hear because it’s in another room beats any amount of foam. Tap the approaches in Part 1 to see what actually works.
(another room)
(levers 1–4)
(door / barrier)
(acoustic foam)
Contain the noise, not the heat
Key Takeaways
- Moving your rig into another room or closet is the most effective noise reduction method.
- Layered treatment—blankets, foam, sealing gaps—outperforms single materials for sound quality.
- Sealing the closet door with blankets or weatherstripping greatly reduces sound leakage.
- Proper placement of absorbers and barriers at reflection points improves clarity and reduces echo.
- Ventilation is critical—never trap heat in a sealed closet without active airflow to prevent overheating.
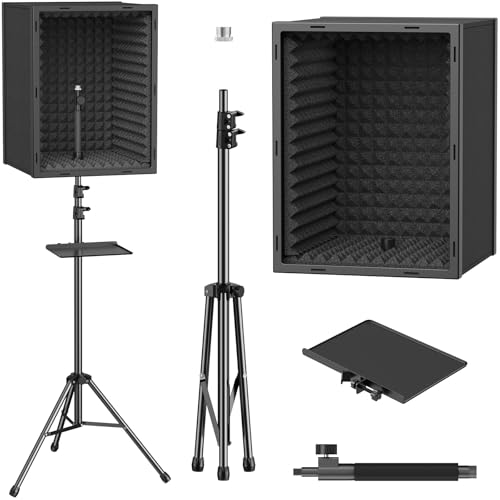
TONOR Personal Vocal Booth, Microphone Isolation Shield for Studio, Framed Acoustic Foam Box, Sound Absorbing, for Professional Recording, Podcast, Singing, Adjustable Height, Max 190 cm/53.1inch
Sound Absorption & Isolation: This vocal booth features a box design combining five high-density foam and sound absorbing...
As an affiliate, we earn on qualifying purchases.
As an affiliate, we earn on qualifying purchases.
Why Moving Your Rig Is the Best Noise Solution
Putting your rig in a different room or closet is the most effective way to cut noise. It’s like building a barrier that keeps sound from reaching your ears. Imagine a loud GPU rig humming in a closet on the other side of the house—your workspace stays perfectly quiet.
All the soundproofing tricks in the world won’t beat distance. Remote inference rigs are common in AI work now—your machine can roar in a closet while you work peacefully at your desk. Just remember: a wired connection and good ventilation are key.

Focusound 52 Pack Acoustic Foam Panels 1" x 12" x 12" Sound Proof Foam Panles Soundproofing Noise Cancelling Wedge Panels for Home Office Recoding Studio with 300PCS Double-Side Adhesive
Soundproofing - Acoustic foam panels triangular grooves structure for better noise absorption, helps to reduce and absorb unwanted...
As an affiliate, we earn on qualifying purchases.
As an affiliate, we earn on qualifying purchases.
The 'Rig in the Closet' Setup — What Works and What Doesn’t
Sealing a closet or cabinet traps heat, which can cook your machine. The key is airflow. Use passive vents or quiet exhaust fans to let heat escape. Consider a purpose-built soundproof cabinet with ducted airflow if you want silence and cooling.
Active ventilation prevents heat buildup, keeping your rig cool and quiet. A small exhaust fan pulling hot air out and fresh air in works wonders. Remember: trapping heat can throttle your machine and cause fans to spin loudly.
For detailed cooling strategies, check out this guide to reducing heat and noise in AI workstations.

Audimute Soundproofing Acoustic Door Seal Kit - Door Sweep and Seal - (Large Size)
Includes (2) Door Seals (3/16" x 1/2" x 50') and (1) Door Sweep (1/2" x 1.5" x 25').
As an affiliate, we earn on qualifying purchases.
As an affiliate, we earn on qualifying purchases.
Absorption vs. Isolation — Why Both Matter in a Closet
Acoustic dampening and soundproofing are two sides of the same coin. Absorption reduces echoes inside the closet—think of it as softening the walls—while isolation stops sound from leaking out. If you only treat reflections, noise still escapes.
Understanding the difference helps you make smarter choices. Absorption materials like foam or blankets soak up internal reflections, preventing echo and making your recordings clearer. Isolation measures—such as sealing gaps or adding mass—prevent sound from escaping, protecting your neighbors or recording other parts of your home. Both are necessary for a balanced setup. Neglecting one can lead to issues like echo or unwanted noise leakage, undermining your efforts. The tradeoff is that adding mass or sealing gaps can sometimes make the space less accessible or more cumbersome, so plan carefully to balance convenience with acoustic performance.

Sound Addicted - Studio Monitor Isolation Pads suitable for 6.5, 7 and 8 Inches Large Speakers | Reduce Vibrations and Fits most Stands - Pair | SMPad 8
SMPad 8 is made out of the highest quality acoustical foam (50kg/m^3 density).
As an affiliate, we earn on qualifying purchases.
As an affiliate, we earn on qualifying purchases.
Placement Strategies: Where to Focus Your Absorbers and Barriers
In a tiny space like a closet, placement is everything. Start with the reflection points: the wall behind your mic, the ceiling, and nearby surfaces. These are the spots where sound bounces most, causing boxy or echoey recordings. Proper placement and layering ensures you target the most problematic reflections.
For example, placing an acoustic panel directly behind your mic or on the ceiling can significantly reduce early reflections, which are primary contributors to a dull or echoey sound. Treating the door with a blanket or foam reduces sound leakage, but also consider sealing gaps with weatherstripping for maximum effectiveness. Use the room’s geometry to your advantage: small closets naturally limit some reflections, but standing waves or low-end buildup can still occur, especially at low frequencies. Bass traps placed in the upper corners help tame these issues, preventing the low-end from muddying your recordings. Remember: layering multiple treatment types—blankets, foam, mass—creates a more comprehensive barrier than relying on a single solution. Check out this guide on strategic placement and layering for detailed insights.
Treat the Closet Door and Gaps—Your Hidden Weak Point
The closet door is often the biggest sound leak. It’s hollow, often comes with gaps, and acts like a speaker grille for noise. Blocking or treating it is crucial because sound escapes through every crack and hollow space, undermining your entire setup.
Hanging a thick blanket or moving pad in front of the door can dramatically reduce sound leakage. Sealing cracks with weatherstripping or acoustic sealant makes the biggest difference in preventing sound from slipping out. For a more robust solution, consider installing a door with a built-in seal or replacing your door with a purpose-built soundproof model. These options create a much tighter seal, significantly improving isolation. Keep in mind that the effectiveness depends on how well you seal all gaps and cracks; even small openings can let in or leak out unwanted noise. The tradeoff is that more sealing and heavier doors might make access less convenient, so balance your need for silence with practicality.
Maximize Your Closet's Geometry — Small Can Be Better
Small closets have unique advantages—they naturally limit how far sound can bounce around. But they also risk low-frequency build-up due to parallel surfaces, which can cause a boomy, muddy sound. Understanding these effects allows you to leverage the space effectively.
Adding bass traps in the corners can significantly control these low frequencies, preventing them from overpowering your recordings. Using thick curtains or moving blankets on the walls helps break up standing waves, reducing resonances that color your sound. For example, a closet with foam-lined door, corner bass traps, and a rug on the floor can produce a much clearer, more balanced sound than an untreated space. Sealing gaps and using soft materials on reflective surfaces further improve acoustics. The key is to recognize that small rooms naturally emphasize certain frequencies and to tailor your treatments accordingly, turning limitations into advantages.
Layering Materials for Better Soundproofing and Absorption
One layer of foam or blankets isn’t enough. Layering different materials—blankets, foam, rugs—creates a more effective barrier because each layer targets different frequencies and sound behaviors. Air gaps between layers enhance absorption and isolation, preventing sound from passing through easily.
For example, hanging a quilt with air behind it, then adding foam panels, improves both soundproofing and internal acoustics. Combining mass with absorption—like adding a second drywall layer or mass-loaded vinyl—further reduces sound transmission. The tradeoff is that more layers can make the space less accessible or more cumbersome to set up, so balance the need for sound isolation with practicality. Think of it as building a multi-layered fortress—each layer adds strength and effectiveness. Check out this guide to layering strategies for comprehensive approaches.
The Mic Matters: Choosing the Right Microphone for a Tiny Space
In small, treated spaces, your microphone choice makes a big difference. A mic with tight pickup patterns—like a hypercardioid or shotgun—reduces side noise and room reflections, helping to isolate your voice from ambient sounds.
For example, a dynamic mic like the Shure SM58 or a small-diaphragm condenser can better focus on your voice and reject unwanted noise than a wide-pattern condenser. Placement is equally important: keep the mic close to your mouth and aim it away from reflective surfaces. Using a pop filter or foam windscreen further reduces plosives and reflections, ensuring a cleaner recording. The tradeoff is that higher-quality, directional mics can be more expensive, but they are often worth the investment for small, acoustically treated spaces where every detail counts.
Managing Low-End and Standing Waves in a Tiny Closet
Low-frequency buildup causes that boomy, boxy sound—common in small, parallel rooms. To combat it, add bass traps in the upper corners or along the floor-wall junctions. These traps absorb the problematic low-end resonances before they become overwhelming.
For example, a simple DIY bass trap made from rockwool or dense foam placed in the corners can tame low end effectively. Angling surfaces or using uneven treatments prevents standing waves from reinforcing each other. Monitoring your sound with a good bass response helps you identify if low-end issues persist, guiding your placement of traps or diffusers. The tradeoff is that bass trapping can take up space or be visually intrusive, so consider your aesthetic and functional needs when designing your treatment plan.
What You Can Achieve with a Closet Booth
A closet can be a surprisingly good recording space—quiet, controlled, and affordable. It’s ideal for vocals, podcasts, and voice-overs. But it’s not a full studio. Expect some limitations: low-end issues, small size, and imperfect isolation. Recognizing these tradeoffs helps you set realistic expectations and prioritize your treatments effectively.
With layered absorption, sealing gaps, and smart placement, you can produce quality recordings that rival more elaborate setups. Many creators find that a well-treated closet boosts their audio quality significantly without the hassle and expense of building a dedicated studio. The key is to understand your space’s limitations and work within them, focusing on clarity and noise reduction. This approach allows you to achieve professional results in a small footprint, making your home setup both practical and effective.
Frequently Asked Questions
Can I really turn my closet into a usable vocal booth?
Yes. By adding absorption, sealing gaps, and managing reflections, a closet can produce professional-quality recordings for vocals, podcasts, or voice-overs—especially when combined with proper microphone placement.Where should I place foam or panels in a closet studio?
Start with reflection points: behind your mic, the ceiling, and nearby walls. Cover these spots first. Then, treat the door and any large flat surfaces that cause echo or sound leakage.Do I need bass traps or just foam panels?
Foam panels help with mid and high frequencies, but bass traps are essential if you notice a muddy or boomy sound. In small closets, corner bass traps can make a big difference for clear lows.How much sealing or treatment is enough?
Seal all gaps around the door and walls with weatherstripping or acoustic sealant. Layer blankets or foam on the door, and add acoustic panels on reflection points. More layers generally improve isolation and sound quality.Will a closet booth work for streaming or just voice recording?
It works well for both, especially for voice and streaming. It’s less ideal for drums or loud instruments due to limited space and potential low-frequency issues. Focus on vocal clarity and noise reduction.Conclusion
Transforming a closet into a quiet, effective recording space is less about fancy foam and more about strategy. Focus on placement, sealing gaps, and layering materials. Your closet can become a surprisingly professional-sounding booth with just a little planning.
Picture a tiny space where your voice sounds full, clear, and free of unwanted noise. That’s the power of smart setup—making the most of what you have, not what you wish for. So, next time you hear that hum, remember: the best noise reduction starts with a good plan, not just foam.